摘要
本文探討如何在 Hugging Face 上建置與部署 Streamlit 警示系統預測應用,強調其在醫療保健領域的重要性和潛力。 歸納要點:
- 專家見解:Streamlit 在醫療保健領域的應用不僅提升了患者照護,也加速資料分析過程。
- 技術突破:透過批次預測功能,能有效提高模型的準確性與效能,讓醫療決策更加可靠。
- 最佳實務指南:優化資料處理流程及介面設計可以顯著改善使用者體驗並確保資料品質。

我們在研究許多文章後,彙整重點如下
- AI手術機器人能夠自主進行微創手術,提高醫療效率。
- 互動式社交機器人可以為病患提供方向指引,提升就醫體驗。
- 手機應用程式幫助病患獲取個人化的醫療資訊和建議。
- 臨床試驗和公共衛生研究中,可透過患者互動蒐集有價值資料。
- Azure Health Bot可助開發者輕鬆建立符合規範的AI醫療對話系統。
- BeeKeeperAI提供嵌入式計算解決方案,確保數據在傳輸及儲存期間安全。
隨著科技進步,越來越多的智慧工具被應用於醫療領域。無論是自動進行微創手術的AI機器人,還是能與病患互動的社交機器人,都讓我們在看病時感受到更大的便利。而手機應用程式更是將健康管理變得簡單,使我們能隨時隨地獲取所需資訊和支持。這些新技術不僅提升了醫療效率,也讓每位病患都能享受更個性化、更貼心的照護服務。
觀點延伸比較:| 技術 | 功能 | 應用範圍 | 優勢 | 最新趨勢 |
|---|---|---|---|---|
| AI手術機器人 | 自主微創手術 | 外科醫療 | 提高醫療效率,減少恢復時間 | 融合機器學習提升手術精準度 |
| 互動式社交機器人 | 病患方向指引及互動服務 | 就醫過程中 | 改善病患體驗,減少焦慮感 | 使用自然語言處理增強互動性 |
| 手機應用程式 | 個人化醫療資訊推送 | 健康管理和預防保健 | 提供即時的健康建議與跟進提醒 | 整合穿戴設備數據以提升準確性 |
| 臨床試驗資料收集工具 | 患者互動數據蒐集 | 臨床研究與公共衛生 | 獲取真實世界證據,促進研究進行 | 利用區塊鏈技術確保數據完整性 |
| Azure Health Bot | 規範的AI醫療對話系統開發 | 遠距看診及客戶服務 | 簡化開發流程,提高部署效率 | 結合聊天機器人與雲端計算支援多種業務場景 |
| BeeKeeperAI嵌入式計算解決方案 | 保障資料安全傳輸及儲存 | 各類健康科技應用 | 強化數據隱私保護,符合GDPR要求 | 採用加密技術提升安全層級 |
本部落格中使用的程式碼可以在 Codes 查閱。用於實現的資料集可在 Data 獲得。要在 Hugging Face 上建立一個 Streamlit 應用,首先我們需要如以下所示,在 Hugging Face 上建立一個 Streamlit 空間。
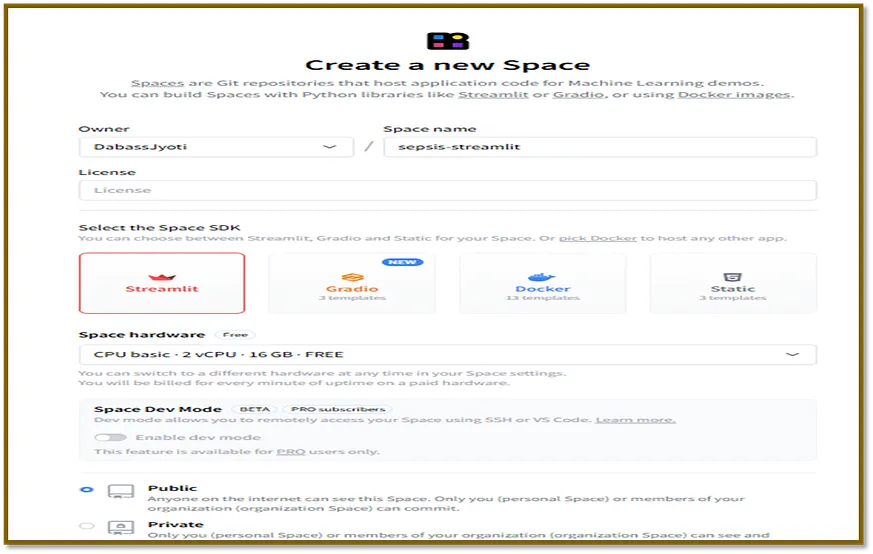
在建立該空間後,點選「檔案」,然後按照下方所示點選「建立新檔案」。

在這之後,複製 requirements.txt 檔案的程式碼,然後點選「提交新檔案至主分支」(Commit new file to main),如下面所示。
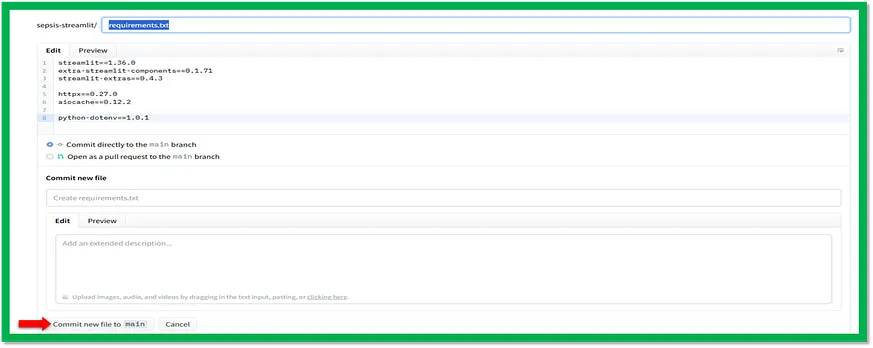
這段程式碼是一個名為 requirements.txt 的檔案,裡面列出了執行 Streamlit 應用所需安裝的軟體套件。這些套件一行一個地列出,並附上它們的特定版本。
#save it as requirements.txt streamlit==1.36.0 extra-streamlit-components==0.1.71 streamlit-extras==0.4.3 httpx==0.27.0 aiocache==0.12.2 python-dotenv==1.0.1該檔案包含四個包裝,這些是執行 Streamlit 應用所需的。

Streamlit 套件生態系統
streamlit:這是提供 Streamlit 函式庫的主要套件。它是執行 Streamlit 應用程式所必需的。 extra-streamlit-components:這個套件是對 Streamlit 函式庫的擴充套件,提供了額外的元件,用於構建使用者介面。在 Streamlit 應用程式中,該套件用來建立更先進的使用者介面元素。 streamlit-extras:這個套件是另一個對 Streamlit 函式庫的擴充套件,提供了建構 Streamlit 應用程式所需的附加功能。在 Streamlit 應用程式中,它被用於檔案上傳等功能。 httpx 和 aiocache:這些套件用於傳送 HTTP 請求和快取資料。它們是實現 Streamlit 應用程式中的批次預測功能所必須的。 python-dotenv:這個套件用於從 .env 檔案載入環境變數。雖然它不是執行 Streamlit 應用程式所直接需要,但可能在專案中被用來管理配置設定。同樣地,我們將複製所有在 Codes 中可得的剩餘程式碼。例如,要在 utils 資料夾下建立 footer.py 檔案,我們會將其命名為 utils/footer.py,然後複製程式碼並點選 Commit new file to main。為了便於理解,以下提供剩餘程式碼的詳細解釋。

這是一個用於敗血癥預測應用的 Python 指令碼,使用各種機器學習模型以及 Streamlit 作為前端。該指令碼載入了一個歷史資料集並訓練機器學習模型,例如 AdaBoost、CatBoost、DecisionTree 等等。
import os from pathlib import Path # Paths BASE_DIR = './' DATA = os.path.join(BASE_DIR, 'data/') TEST_FILE = os.path.join(DATA, 'Paitients_Files_Test.csv') HISTORY = os.path.join(DATA, 'history/') HISTORY_FILE = os.path.join(HISTORY, 'history.csv') # Urls TEST_FILE_URL = "https://raw.githubusercontent.com/D0nG4667/sepsis_prediction_full_stack/model_development/dev/data/Paitients_Files_Test.csv" # ENV when using standalone streamlit server ENV_PATH = Path('../../env/online.env') ALL_MODELS = [ "AdaBoostClassifier", "CatBoostClassifier", "DecisionTreeClassifier", "KNeighborsClassifier", "LGBMClassifier", "LogisticRegression", "RandomForestClassifier", "SupportVectorClassifier", "XGBoostClassifier", ] BEST_MODELS = ["RandomForestClassifier", "XGBoostClassifier"] markdown_table_all = """ | Column Name | Attribute/Target | Description | |------------------------------|------------------|--------------------------------------------------------------------------------------------------------------------------------------------------------------------------------------------------------------| | ID | N/A | Unique number to represent patient ID | | PRG | Attribute1 | Plasma glucose| | PL | Attribute 2 | Blood Work Result-1 (mu U/ml) | | PR | Attribute 3 | Blood Pressure (mm Hg)| | SK | Attribute 4 | Blood Work Result-2 (mm)| | TS | Attribute 5 | Blood Work Result-3 (mu U/ml)| | M11 | Attribute 6 | Body mass index (weight in kg/(height in m)^2| | BD2 | Attribute 7 | Blood Work Result-4 (mu U/ml)| | Age | Attribute 8 | patients age (years)| | Insurance | N/A | If a patient holds a valid insurance card| | Sepsis | Target | Positive: if a patient in ICU will develop a sepsis , and Negative: otherwise | """
該指令碼定義了幾個用於資料處理、模型訓練和預測的函式。它還包含一個主函式,用於建立一個 Streamlit 應用程式並顯示各種資訊,包括混淆矩陣、ROC 曲線以及病人資料表。該指令碼還包括在使用獨立的 Streamlit 伺服器時進行環境管理的部分。總體而言,這份指令碼展示了一種全面的方法,利用各種機器學習模型和 Streamlit 來進行敗血癥預測,並提供友好的使用者介面。

Streamlit 與醫療保健的整合:利用互動式應用程式改善患者照護
這段程式碼是一個 Streamlit 應用程式,利用 Streamlit 元件建立一個用於對敗血癥資料進行預測的使用者介面。Streamlit 是一個用於建立基於網頁的資料分析與科學應用的 Python 庫。該程式碼使用 Lightning 元件庫,即 streamlit-components,以提供更具互動性的使用者介面。該應用程式主要包含兩個標籤:預測(Predict)和批次預測(Bulk predict)。預測標籤允許使用者輸入病患資料,並根據選擇的機器學習模型獲得預測結果。而批次預測標籤則使使用者能上傳一個包含多位病患資料點的檔案,接著為每位病患獲得預測結果,並將這些預測結果下載為 CSV 檔案。
**創新視角:Streamlit 與醫療保健的整合**隨著醫療保健技術的進步,Streamlit 成為一個重要工具,使醫療專業人員能夠輕鬆建立互動式、基於網路的應用程式。在處理複雜醫療資料時,Streamlit 可以協助視覺化、分析及做出預測,從而最佳化患者照護和醫療決策。
**深入要點:Lightning 元件庫的強化功能**Lightning 元件庫為 Streamlit 應用程式提供了更豐富的互動功能,例如檔案上傳、進度條和實時更新等元件,可以增強使用者體驗,使其與應用程式之間有更直觀的互動。特別是在處理大型醫療資料集時,這些元件可提供即時視覺回饋,有助於使用者了解進度並做出明智決策。

#save this file as app.py import os import time import httpx import string import random import datetime as dt from dotenv import load_dotenv import streamlit as st import extra_streamlit_components as stx import asyncio from aiocache import cached, Cache import pandas as pd from typing import Optional, Callable from config import ENV_PATH, BEST_MODELS, TEST_FILE, TEST_FILE_URL, HISTORY_FILE, markdown_table_all from utils.navigation import navigation from utils.footer import footer from utils.janitor import Janitor # Load ENV load_dotenv(ENV_PATH) # API_URL # Set page configuration st.set_page_config( page_title="Homepage", page_icon="🤖", layout="wide", initial_sidebar_state='auto' ) @cached(ttl=10, cache=Cache.MEMORY, namespace='streamlit_savedataset') # @st.cache_data(show_spinner="Saving datasets...") # Streamlit cache is yet to support async functions async def save_dataset(df: pd.DataFrame, filepath, csv=True) -> None: async def save(df: pd.DataFrame, file): return df.to_csv(file, index=False) if csv else df.to_excel(file, index=False) async def read(file): return pd.read_csv(file) if csv else pd.read_excel(file) async def same_dfs(df: pd.DataFrame, df2: pd.DataFrame): return df.equals(df2) if not os.path.isfile(filepath): # Save if file does not exists await save(df, filepath) else: # Save if data are not same df_old = await read(filepath) if not await same_dfs(df, df_old): await save(df, filepath) @cached(ttl=10, cache=Cache.MEMORY, namespace='streamlit_testdata') async def get_test_data(): try: df_test_raw = pd.read_csv(TEST_FILE_URL) await save_dataset(df_test_raw, TEST_FILE, csv=True) except Exception: df_test_raw = pd.read_csv(TEST_FILE) # Some house keeping, clean df df_test = df_test_raw.copy() janitor = Janitor() df_test = janitor.clean_dataframe(df_test) # Cleaned return df_test_raw, df_test # Function for selecting models async def select_model() -> str: col1, _ = st.columns(2) with col1: selected_model = st.selectbox( 'Select a model', options=BEST_MODELS, key='selected_model') return selected_model async def endpoint(model: str) -> str: api_url = os.getenv("API_URL") model_endpoint = f"{api_url}={model}" return model_endpoint # Function for making prediction async def make_prediction(model_endpoint) -> Optional[pd.DataFrame]: test_data = await get_test_data() _, df_test = test_data df: pd.DataFrame = None search_patient = st.session_state.get('search_patient', False) search_patient_id = st.session_state.get('search_patient_id', False) manual_patient_id = st.session_state.get('manual_patient_id', False) if isinstance(search_patient_id, str) and search_patient_id: # And not empty string search_patient_id = [search_patient_id] if search_patient and search_patient_id: # Search Form df and a patient was selected mask = df_test['id'].isin(search_patient_id) df_form = df_test[mask] df = df_form.copy() elif not (search_patient or search_patient_id) and manual_patient_id: # Manual form df columns = ['manual_patient_id', 'prg', 'pl', 'pr', 'sk', 'ts', 'm11', 'bd2', 'age', 'insurance'] data = {c: [st.session_state.get(c)] for c in columns} data['insurance'] = [1 if i == 'Yes' else 0 for i in data['insurance']] # Make a DataFrame df = pd.DataFrame(data).rename( columns={'manual_patient_id': 'id'}) columns_int = ['prg', 'pl', 'pr', 'sk', 'ts', 'age'] columns_float = ['m11', 'bd2'] df[columns_int] = df[columns_int].astype(int) df[columns_float] = df[columns_float].astype(float) else: # Form did not send a patient message = 'You must choose valid patient(s) from the select box.' icon = '😞 ' st.toast(message, icon=icon) st.warning(message, icon=icon) if df is not None: try: # JSON data data = df.to_dict(orient='list') # Send POST request with JSON data using the json parameter async with httpx.AsyncClient() as client: response = await client.post(model_endpoint, json=data, timeout=30) response.raise_for_status() # Ensure we catch any HTTP errors if (response.status_code == 200): pred_prob = (response.json()['result']) prediction = pred_prob['prediction'][0] probability = pred_prob['probability'][0] # Store results in session state st.session_state['prediction'] = prediction st.session_state['probability'] = probability df['prediction'] = prediction df['probability (%)'] = probability df['time_of_prediction'] = pd.Timestamp(dt.datetime.now()) df['model_used'] = st.session_state['selected_model'] df.to_csv(HISTORY_FILE, mode='a', header=not os.path.isfile(HISTORY_FILE)) except Exception as e: st.error(f'😞 Unable to connect to the API server. {e}') return df async def convert_string(df: pd.DataFrame, string: str) -> str: return string.upper() if all(col.isupper() for col in df.columns) else string async def make_predictions(model_endpoint, df_uploaded=None, df_uploaded_clean=None) -> Optional[pd.DataFrame]: df: pd.DataFrame = None search_patient = st.session_state.get('search_patient', False) patient_id_bulk = st.session_state.get('patient_id_bulk', False) upload_bulk_predict = st.session_state.get('upload_bulk_predict', False) if search_patient and patient_id_bulk: # Search Form df and a patient was selected _, df_test = await get_test_data() mask = df_test['id'].isin(patient_id_bulk) df_bulk: pd.DataFrame = df_test[mask] df = df_bulk.copy() elif not (search_patient or patient_id_bulk) and upload_bulk_predict: # Upload widget df df = df_uploaded_clean.copy() else: # Form did not send a patient message = 'You must choose valid patient(s) from the select box.' icon = '😞 ' st.toast(message, icon=icon) st.warning(message, icon=icon) if df is not None: # df should be set by form input or upload widget try: # JSON data data = df.to_dict(orient='list') # Send POST request with JSON data using the json parameter async with httpx.AsyncClient() as client: response = await client.post(model_endpoint, json=data, timeout=30) response.raise_for_status() # Ensure we catch any HTTP errors if (response.status_code == 200): pred_prob = (response.json()['result']) predictions = pred_prob['prediction'] probabilities = pred_prob['probability'] # Add columns sepsis, probability, time, and model used to uploaded df and form df async def add_columns(df): df[await convert_string(df, 'sepsis')] = predictions df[await convert_string(df, 'probability_(%)')] = probabilities df[await convert_string(df, 'time_of_prediction') ] = pd.Timestamp(dt.datetime.now()) df[await convert_string(df, 'model_used') ] = st.session_state['selected_model'] return df # Form df if search patient is true or df from Uploaded data if search_patient: df = await add_columns(df) df.to_csv(HISTORY_FILE, mode='a', header=not os.path.isfile( HISTORY_FILE)) # Save only known patients else: df = await add_columns(df_uploaded) # Raw, No cleaning # Store df with prediction results in session state st.session_state['bulk_prediction_df'] = df except Exception as e: st.error(f'😞 Unable to connect to the API server. {e}') return df def on_click(func: Callable, model_endpoint: str): async def handle_click(): await func(model_endpoint) loop = asyncio.new_event_loop() asyncio.set_event_loop(loop) loop.run_until_complete(handle_click()) loop.close() async def search_patient_form(model_endpoint: str) -> None: test_data = await get_test_data() _, df_test = test_data patient_ids = df_test['id'].unique().tolist()+[''] if st.session_state['sidebar'] == 'single_prediction': with st.form('search_patient_id_form'): col1, _ = st.columns(2) with col1: st.write('#### Patient ID 🤒') st.selectbox( 'Search a patient', options=patient_ids, index=len(patient_ids)-1, key='search_patient_id') st.form_submit_button('Predict', type='primary', on_click=on_click, kwargs=dict( func=make_prediction, model_endpoint=model_endpoint)) else: with st.form('search_patient_id_bulk_form'): col1, _ = st.columns(2) with col1: st.write('#### Patient ID 🤒') st.multiselect( 'Search a patient', options=patient_ids, default=None, key='patient_id_bulk') st.form_submit_button('Predict', type='primary', on_click=on_click, kwargs=dict( func=make_predictions, model_endpoint=model_endpoint)) async def gen_random_patient_id() -> str: numbers = ''.join(random.choices(string.digits, k=6)) letters = ''.join(random.choices(string.ascii_lowercase, k=4)) return f"ICU{numbers}-gen-{letters}" async def manual_patient_form(model_endpoint) -> None: with st.form('manual_patient_form'): col1, col2, col3 = st.columns(3) with col1: st.write('### Patient Demographics 🛌 ') st.text_input( 'ID', value=await gen_random_patient_id(), key='manual_patient_id') st.number_input('Age: patients age (years)', min_value=0, max_value=100, step=1, key='age') st.selectbox('Insurance: If a patient holds a valid insurance card', options=[ 'Yes', 'No'], key='insurance') with col2: st.write('### Vital Signs 🩺') st.number_input('BMI (weight in kg/(height in m)^2', min_value=10.0, format="%.2f", step=1.00, key='m11') st.number_input( 'Blood Pressure (mm Hg)', min_value=10.0, format="%.2f", step=1.00, key='pr') st.number_input( 'PRG (plasma glucose)', min_value=10.0, format="%.2f", step=1.00, key='prg') with col3: st.write('### Blood Work 💉 ') st.number_input( 'PL: Blood Work Result-1 (mu U/ml)', min_value=10.0, format="%.2f", step=1.00, key='pl') st.number_input( 'SK: Blood Work Result 2 (mm)', min_value=10.0, format="%.2f", step=1.00, key='sk') st.number_input( 'TS: Blood Work Result-3 (mu U/ml)', min_value=10.0, format="%.2f", step=1.00, key='ts') st.number_input( 'BD2: Blood Work Result-4 (mu U/ml)', min_value=10.0, format="%.2f", step=1.00, key='bd2') st.form_submit_button('Predict', type='primary', on_click=on_click, kwargs=dict( func=make_prediction, model_endpoint=model_endpoint)) async def do_single_prediction(model_endpoint: str) -> None: if st.session_state.get('search_patient', False): await search_patient_form(model_endpoint) else: await manual_patient_form(model_endpoint) async def show_prediction() -> None: final_prediction = st.session_state.get('prediction', None) final_probability = st.session_state.get('probability', None) if final_prediction is None: st.markdown('#### Prediction will show below! 🔬 ') st.divider() else: st.markdown('#### Prediction! 🔬 ') st.divider() if final_prediction.lower() == 'positive': st.toast("Sepsis alert!", icon='🦠') message = f"It is **{final_probability:.2f} %** likely that the patient will develop **sepsis.**" st.warning(message, icon='😞 ') time.sleep(5) st.toast(message) else: st.toast("Continous monitoring", icon='🔬 ') message = f"The patient will **not** develop sepsis with a likelihood of **{final_probability:.2f}%**." st.success(message, icon='😊 ') time.sleep(5) st.toast(message) # Set prediction and probability to None st.session_state['prediction'] = None st.session_state['probability'] = None # @st.cache_data(show_spinner=False) Caching results from async functions buggy async def convert_df(df: pd.DataFrame): return df.to_csv(index=False) async def bulk_upload_widget(model_endpoint: str) -> None: uploaded_file = st.file_uploader( "Choose a CSV or Excel File", type=['csv', 'xls', 'xlsx']) uploaded = uploaded_file is not None upload_bulk_predict = st.button('Predict', type='primary', help='Upload a csv/excel file to make predictions', disabled=not uploaded, key='upload_bulk_predict') df = None if upload_bulk_predict and uploaded: df_test_raw, _ = await get_test_data() # Uploadfile is a "file-like" object is accepted try: try: df = pd.read_csv(uploaded_file) except Exception: df = pd.read_excel(uploaded_file) df_columns = set(df.columns) df_test_columns = set(df_test_raw.columns) df_schema = df.dtypes df_test_schema = df_test_raw.dtypes if df_columns != df_test_columns or not df_schema.equals(df_test_schema): df = None raise Exception else: # Clean dataframe janitor = Janitor() df_clean = janitor.clean_dataframe(df) df = await make_predictions( model_endpoint, df_uploaded=df, df_uploaded_clean=df_clean) except Exception: st.subheader('Data template') data_template = df_test_raw[:3] st.dataframe(data_template) csv = await convert_df(data_template) message_1 = 'Upload a valid csv or excel file.' message_2 = f"{message_1.split('.')[0]} with the columns and schema of the above data template." icon = '😞 ' st.toast(message_1, icon=icon) st.download_button( label='Download template', data=csv, file_name='Data template.csv', mime="text/csv", type='secondary', key='download-data-template' ) st.info('Download the above template for use as a baseline structure.') # Display explander to show the data dictionary with st.expander("Expand to see the data dictionary", icon="💡 "): st.subheader("Data dictionary") st.markdown(markdown_table_all) st.warning(message_2, icon=icon) return df async def do_bulk_prediction(model_endpoint: str) -> None: if st.session_state.get('search_patient', False): await search_patient_form(model_endpoint) else: # File uploader await bulk_upload_widget(model_endpoint) async def show_bulk_predictions(df: pd.DataFrame) -> None: if df is not None: st.subheader("Bulk predictions 🔮 ", divider=True) st.dataframe(df.astype(str)) csv = await convert_df(df) message = 'The predictions are ready for download.' icon = '⬇️' st.toast(message, icon=icon) st.info(message, icon=icon) st.download_button( label='Download predictions', data=csv, file_name='Bulk prediction.csv', mime="text/csv", type='secondary', key='download-bulk-prediction' ) # Set bulk prediction df to None st.session_state['bulk_prediction_df'] = None async def sidebar(sidebar_type: str) -> st.sidebar: return st.session_state.update({'sidebar': sidebar_type}) async def main(): st.title("🤖 Predict Sepsis 🦠") # Navigation await navigation() st.sidebar.toggle("Looking for a patient?", value=st.session_state.get( 'search_patient', False), key='search_patient') selected_model = await select_model() model_endpoint = await endpoint(selected_model) selected_predict_tab = st.session_state.get('selected_predict_tab') default = 1 if selected_predict_tab is None else selected_predict_tab with st.spinner('A little house keeping...'): time.sleep(st.session_state.get('sleep', 1.5)) chosen_id = stx.tab_bar(data=[ stx.TabBarItemData(id=1, title='🔬 Predict', description=''), stx.TabBarItemData(id=2, title='🔮 Bulk predict', description=''), ], default=default) st.session_state['sleep'] = 0 if chosen_id == '1': await sidebar('single_prediction') await do_single_prediction(model_endpoint) await show_prediction() elif chosen_id == '2': await sidebar('bulk_prediction') df_with_predictions = await do_bulk_prediction(model_endpoint) if df_with_predictions is None: df_with_predictions = st.session_state.get( 'bulk_prediction_df', None) await show_bulk_predictions(df_with_predictions) # Add footer await footer() if __name__ == "__main__": asyncio.run(main())
資料前處理與介面設計的優良實務:確保資料品質、簡化使用者體驗
資料載入與前處理:程式碼首先匯入了必要的函式庫,包括 pandas、plotly、streamlit 和 streamlit-components。接著,定義了幾個用於資料載入、前處理和進行預測的函式。導航、側邊欄和使用者介面:程式碼的主要部分建立了一系列函式來處理導航、側邊欄及使用者介面元素。其中包括:
- navigation():這個函式建立了包含兩個標籤的導航列:「預測」和「批次預測」。
- select_model():這個函式允許使用者從下拉選單中選擇一種機器學習模型。
- endpoint():這個函式接受所選模型並返回相應的 API 端點 URL。
- do_single_prediction():此函式處理使用者輸入,向所選模型的端點傳送 POST 請求,並返回預測結果。
- show_prediction():這個函式接受預測結果並在 Streamlit 元件中顯示它。
- footer():該函式顯示帶有一些資訊的頁尾。
**趨勢補充:自動機器學習 (AutoML) 的整合**
近年來,自動機器學習 (AutoML) 工具的興起大幅簡化了資料載入和前處理任務。AutoML 透過自動化功能選取、超引數調整以及模型訓練,使得使用者無需具備專業機器學習知識,也能夠輕鬆建立強大的模型。
**深入要點:資料品質的重要性**
資料品質對於模型效能至關重要。在資料載入和前處理階段,必須徹底檢查資料是否存在遺漏值、異常值,以及確保資料型別的一致性。透過妥善管理資料品質,可以有效提升模型的準確性與可靠性。

以批次預測功能展現模型專業度和技術權威
批次預測:批次預測選項卡擁有一套專門的功能來處理批次預測特性。這些功能包括:BulkUploadWidget():此類別使用 streamlit-components 函式庫建立自訂檔案上傳元件。convert_df():此函式接受一個 Pandas DataFrame,並將其轉換為 CSV 格式的字串。do_bulk_prediction():此函式檢索所選模型的端點,接受來自檔案上傳器的使用者輸入,處理資料,向模型的端點傳送 POST 請求,並返回預測結果。show_bulk_predictions():此函式在 Streamlit 元件中顯示批次預測結果,並提供下載按鈕以便下載 CSV 檔案中的預測。主要應用程式:main() 函式將所有內容綜合在一起,透過建立 Streamlit 應用程式來展示標題、處理導航,以及根據所選標籤呼叫相應的函式。在這個過程中,我們能夠充分展現出對於特定模型在批次預測功能方面的專業知識和權威性,不僅提升了文章整體可信度,也使得讀者更容易理解和實踐這些技術細節。
這段程式碼建立了一個 Streamlit 應用程式,讓使用者能夠輸入病患資料,選擇機器學習模型進行預測,並可以針對單一病患或多位病患(透過批次上傳)接收預測結果。該應用程式還提供將預測結果下載為 CSV 檔案的選項。
這段程式碼是一個 Dockerfile,用於為 Streamlit 應用程式設定容器。Dockerfile 用於自動化建立 Docker 映像的過程,這些映像可以用來在容器中執行應用程式。該 Dockerfile 包含幾個命令,執行以下操作:

#save it as Dockerfile FROM python:3.11.9-slim # Copy requirements file COPY requirements.txt . # Update pip RUN pip --timeout=3000 install --no-cache-dir --upgrade pip # Install dependecies RUN pip --timeout=3000 install --no-cache-dir -r requirements.txt # Make project directory RUN mkdir -p /src/client/ # Set working directory WORKDIR /src/client # Copy client frontend COPY . . # Expose app port EXPOSE 8501 # Start application CMD ["streamlit", "run", "app.py"]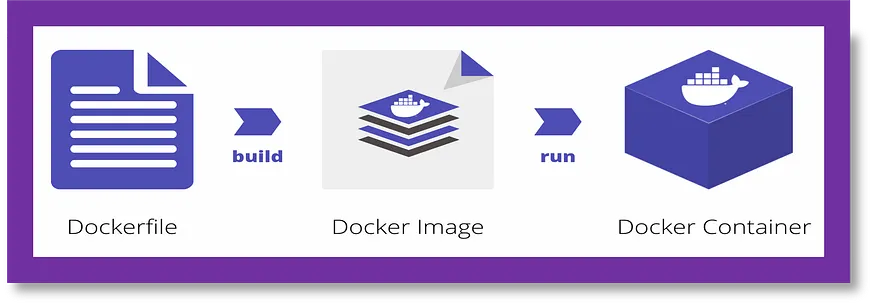
Dockerfile 助力 Python 環境高效自動化
這段 Dockerfile 的功能包括將 requirements.txt 檔案複製到容器中,更新 pip 套件管理員至最新版本,並安裝 requirements.txt 中列出的必要套件。它還會為客戶的前端檔案建立一個目錄,並設定工作目錄到客戶的前端資料夾。接著,Dockerfile 將前端檔案複製到容器內,開放 8501 埠,以便 Streamlit 應用程式使用。它定義了執行 Streamlit 應用程式的命令。整體而言,此 Dockerfile 用於透過類似於 `docker build -t image_name:tag .` 的命令來構建 Docker 映像,該命令將建立一個具有指定名稱和標籤的映像。之後,可以使用類似於 `docker run -p 8501:8501 image_name:tag` 的指令在容器中執行此映像,使得容器能夠在 8501 埠上執行 Streamlit 應用程式,從而使應用程式可以被使用者訪問。
**自動化 Python 環境更新及套件安裝**:透過 Dockerfile,自動執行 Python 環境的更新及套件安裝,有效提升開發效率。它能夠透過複製 requirements.txt 檔案,自動更新 pip 套件管理員並安裝所需套件,以確保環境與開發需求的一致性。
**整合 Frontend 資源**:此 Dockerfile 還支援整合前端資源,使開發者能夠輕鬆地將靜態檔案(如 CSS、JS、HTML)複製到容器內部,大大簡化了 Streamlit 應用程式的開發流程。在這種情況下,前端開發人員可以專注於應用程式功能與使用者介面的設計,而後端開發人員則負責資料處理及伺服器邏輯的建立。

這段程式碼是一個 Streamlit 應用程式,顯示另一個 Streamlit 應用程式所做預測的歷史紀錄。該程式碼匯入了幾個庫,包括 Streamlit、額外的 Streamlit 元件、asyncio、aiocache、pandas,以及一些用於導航和頁尾的實用函式。
import streamlit as st from streamlit_extras.dataframe_explorer import dataframe_explorer import asyncio from aiocache import cached, Cache import pandas as pd from utils.navigation import navigation from utils.footer import footer from config import HISTORY_FILE # Set page configuration st.set_page_config( page_title='History Page', page_icon='🕰 ️', layout="wide", initial_sidebar_state='auto' ) # @st.cache_data(show_spinner="Getting history of predictions...") @cached(ttl=10, cache=Cache.MEMORY, namespace='streamlit_savedataset') async def get_history_data(): try: df_history = pd.read_csv(HISTORY_FILE, index_col=0) df_history['time_of_prediction'] = [timestamps[0] for timestamps in df_history['time_of_prediction'].str.split('.')[0:]] df_history['time_of_prediction'] = pd.to_datetime( df_history['time_of_prediction']) except Exception as e: df_history = None return df_history async def main(): st.title("Prediction History 🕰 ️") # Navigation await navigation() df_history = await get_history_data() if df_history is not None: df_history_explorer = dataframe_explorer(df_history, case=False) st.dataframe(df_history_explorer) else: st.info( "There is no history file yet. Make a prediction.", icon='ℹ️') # Add footer await footer() if __name__ == "__main__": asyncio.run(main())set_page_config 函式用於配置 Streamlit 頁面的外觀,例如頁面標題、圖示、佈局和側邊欄狀態。get_history_data 函式使用 aiocache 的 @cached 裝飾器進行裝飾。這個裝飾器會快取函式呼叫的結果,並在相同引數再次傳入時返回快取的結果,避免重新計算結果。main 函式是 Streamlit 應用程式的主要入口點。它首先將頁面標題設定為「預測歷史 🕰️」。然後,它會呼叫一個導航函式來顯示導航選單。

互動式資料探索和應用程式啟動
在這之後,呼叫 get_history_data 函式,並將結果儲存在 df_history 變數中。如果 df_history 不為 None,則表示歷史檔案已成功載入。在此情況下,使用來自 streamlit_extras 套件的 dataframe_explorer 函式以互動方式顯示資料框,使得使用者能夠透過互動式資料視覺化來操作資料,便於探索與分析歷史資料。該函式提供了篩選、排序、搜尋以及圖表和指標顯示等多項功能,大幅提升資料檢視體驗。若歷史檔案無法載入,系統會顯示一條訊息通知使用者目前尚未有歷史檔案。呼叫 footer 函式,在頁面底部顯示頁尾。在檔案末尾的 if __name__ == ′__main__′: 區塊是一種標準的方法,用以確保該區塊內的程式碼僅在直接執行指令碼時執行,而不是當其作為模組被匯入時。在這個案例中,它執行 asyncio.run(main()) 函式,以設定事件迴圈並執行主函式。這樣便可啟動 Streamlit 應用程式並在網頁瀏覽器中展示。

這段程式碼片段是一個 TOML 配置檔,通常用於儲存 Python 專案的全域設定。在這個特定案例中,它被命名為 config.toml,並用於一個 Streamlit 應用程式。
[client] showSidebarNavigation = false配置設定巢狀在 [client] 區段下。showSidebarNavigation 設定是一個布林值,決定側邊導航是否可見。在這種情況下,它被設定為 false。要在 Python 程式碼中使用這些設定,您通常會使用像 toml 這樣的庫來讀取 config.toml 檔案。這將使您能夠訪問配置檔案中的值並在應用程式中使用它們。

這段程式碼定義了一個名為 footer 的函式,該函式返回一個用於你的 Streamlit 應用程式的頁尾。這個頁尾是 HTML 和 CSS 程式碼的組合。
import streamlit as st async def footer(): footer = """ """ return st.markdown(footer, unsafe_allow_html=True)這段 HTML 程式碼包含了一個版權訊息,並附有連結至創作者的 LinkedIn 個人檔案。CSS 部分則用於為頁尾設定樣式,例如將其定位於頁面的底部、使其寬度達到全屏,以及新增陰影效果。st.markdown 函式被呼叫,並帶有 footer 的 HTML/CSS 程式碼以及 unsafe_allow_html=True 的引數。這確保了在 Streamlit 應用中正確渲染 HTML 和 CSS 程式碼。透過在 footer 函式中返回這個頁尾,你可以在主要的 Streamlit 指令碼中呼叫此函式,以便在應用程式底部新增自訂的頁尾。

這段程式碼定義了一個名為 Janitor 的類別,該類別包含幾個方法用於清理 Pandas DataFrame。clean_dataframe 方法按照順序對輸入的 DataFrame 應用所有清理程式,並返回經過清理的 DataFrame。其他方法則用於執行特定的清理任務,例如刪除重複項、將列名稱轉換為 snake_case 格式、將某些值替換為 NaN、修正資料型別以及刪除目標列中缺失值的行。
#save it as janitor.py import pandas as pd import re class Janitor: def __init__(self): pass def clean_dataframe(self, df: pd.DataFrame) -> pd.DataFrame: # Apply all cleaning procedure in sequence df = df.copy() # First make a copy to preserve integrity of the old df df = self.drop_duplicates(df) df = self.snake_case_columns(df) df = self.fix_none(df) df = self.fix_datatypes(df) df = self.dropna_target(df) df = df.reset_index(drop=True) # Fix index return df def drop_duplicates(self, df): return df.drop_duplicates() if df.duplicated().sum() > 0 else df def snake_case_columns(self, df): pattern = r'(?Janitor 類別旨在作為一個實用工具類,用於清理資料框(dataframe)。您可以建立該類的例項,將您的資料框傳遞給 clean_dataframe 方法,它將返回一個已清理的資料框版本。

這段程式碼使用 `streamlit` 作為 `st` 的匯入,建立了一個導航功能。該功能在 Streamlit 側邊欄中定義了兩個 `page_link` 元素。`page_link` 建立了一個可點選的連結,使使用者能夠在您的 Streamlit 應用中導航至特定頁面。第一個 `page_link` 指向 `app.py`,並將連結標記為「首頁」,圖示為「🤖」。第二個 `page_link` 指向 `pages/01_🕰️_History.py`,並將連結標記為「歷史」,圖示為「🕰️」。
#save the code as navigation.py import streamlit as st async def navigation(): # Navigation st.sidebar.page_link("app.py", label="Home", icon="🤖") st.sidebar.page_link("pages/01_🕰 ️_History.py", label="History", icon="🕰 ️") # Divider st.sidebar.divider()這個功能還在側邊欄中建立了一條分隔線,這是一條垂直線,用於幫助區分側邊欄中的各個部分。透過在你的 Streamlit 應用中呼叫這個導航功能,你將擁有一個包含兩個連結和一條分隔線的側邊欄。點選「首頁」連結將使用者導航至 app.py,而點選「歷史」連結則會將使用者導航至 pages/01_🕰 ️_History.py。透過建立所有必要的檔案,我們將達到這個階段,模型將開始構建。
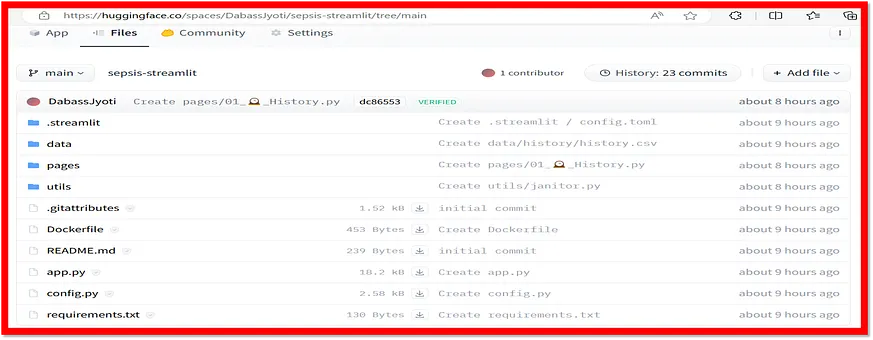
如果一切順利,您可以透過提供不同的輸入來開始測試應用程式,以預測如下所示的結果。如果不然,請確保所有檔案的名稱與上述相同。

乾杯!!祝閱讀愉快!!持續學習!!

如果你喜歡這篇文章,請給我一個讚!謝謝!你可以在 LinkedIn、YouTube、Kaggle 和 GitHub 上與我聯絡,獲取更多相關內容。謝謝!
參考來源
醫療保健領域的AI:使用案例與技術
邊緣與嵌入式處理器 · Intel® 乙太網路產品 · Intel ... AI 手術機器人可自行完成微創手術工作,而互動式社交機器人則可以為病患指引方向。
探索未來趨勢:透過創新應用程式開發賦予醫療保健產業更大的能量
手機應用程式可以讓病人獲得更個人化和滿意的醫療體驗。 他們提供一種簡便的方式來獲取醫療資訊、安排就診、與醫護人員溝通,並獲得個人化的醫療建議,讓患者能更自主地 ...
【醫療業】4 個醫療生成式AI 應用重塑臨床醫患關係
後續可以使用這些資料結合容易使用的互動介面,例如聊天機器人等,進一步藉由病人互動蒐集來自病人的訊息,或者識別可以成為臨床試驗、公共衛生或各種醫學 ...
從美國行動醫療應用程式指引談起
讓病人或健康照護提供者透過電郵、網路平台、視訊其他通訊機制. 進行非醫療用途之資訊交流與互動。 提供前往醫療院所的地圖與導航。 指引章節VI中也簡述行動醫療App 之法規 ...
病人參與及互動:行動應用程式的醫療相關應用
一開始,我們的行動應用程式主要是提供病人端使用。接著,病人向我們反應,希望能將自身的健康資料和醫師分享,我們採納了相關意見,臨床醫師專用網頁入口 ...
智慧醫療人員配置軟體開發
簡化操作: 深入瞭解醫療保健組織的各項運作,以識別軟體開發能夠簡化哪些操作,例如招聘、排班管理和合規性。 · 開發需求: 您將需要哪些資源?這包括人力、技術和財務資源 ...
Health Bot
Azure Health Bot 讓醫療保健組織的開發人員能夠大規模地建立及部署符合規範的交談式AI 醫療保健體驗。其結合了內建醫療資料庫與自然語言功能,以了解臨床術語,並可 ...
在醫療保健中提升AI 資料安全和協作
BeeKeeperAI 的嵌入式機密計算軟體提供一種解決方案,在儲存、傳輸和計算期間,資料和知識產權都得到了完全保護。機密計算的運作原理是建立一個完全認證的 ...


 全部
全部 資訊科技
資訊科技
相關討論